Create Event
Start a new event workspace for planning, guest coordination, and event-day delivery.
Add your Supabase project URL and anon key in config.js, then run supabase-schema.sql in Supabase.
Guest pass
Show this QR code at the door. Opening this pass does not check you in.
%20--%3e%3csvg%20width='30.194817mm'%20height='39.337067mm'%20viewBox='0%200%2030.194817%2039.337067'%20version='1.1'%20id='svg5'%20xml:space='preserve'%20xmlns:inkscape='http://www.inkscape.org/namespaces/inkscape'%20xmlns:sodipodi='http://sodipodi.sourceforge.net/DTD/sodipodi-0.dtd'%20xmlns='http://www.w3.org/2000/svg'%20xmlns:svg='http://www.w3.org/2000/svg'%3e%3csodipodi:namedview%20id='namedview7'%20pagecolor='%23ffffff'%20bordercolor='%23000000'%20borderopacity='0.25'%20inkscape:showpageshadow='2'%20inkscape:pageopacity='0.0'%20inkscape:pagecheckerboard='0'%20inkscape:deskcolor='%23d1d1d1'%20inkscape:document-units='mm'%20showgrid='false'%20/%3e%3cdefs%20id='defs2'%20/%3e%3cg%20inkscape:label='Layer%201'%20inkscape:groupmode='layer'%20id='layer1'%20transform='translate(-76.942102,-102.56294)'%3e%3cg%20id='g4193'%20inkscape:export-filename='livee_logo.svg'%20inkscape:export-xdpi='96'%20inkscape:export-ydpi='96'%3e%3cpath%20style='opacity:1;fill:%2312233f;fill-opacity:1;stroke-width:0.499999'%20d='m%2077.897367,104.51447%20c%20-0.513922,0.42002%20-0.82772,0.96392%20-0.911842,1.65%20l%20-0.04342,33.04342%20c%200.398517,1.73257%201.683955,2.4707%203.430263,2.69211%20l%209.726316,-1.21579%20c%200.502517,0.0104%200.685226,-0.29899%200.781579,-0.69474%20l%20-0.08684,-3.5171%20c%20-0.167375,-0.5303%20-0.472527,-0.91135%20-1.128948,-0.91185%20l%20-5.340789,0.21711%20c%20-0.575557,-0.1277%20-0.775958,-0.5055%20-0.738158,-1.04211%20l%200.04342,-24.44605%20c%20-0.0024,-0.62613%200.435514,-0.56727%200.78158,-0.65131%20l%207.642105,2.99605%20c%200.649756,0.22412%200.588652,0.75924%200.607894,1.25921%20l%20-0.130262,12.46184%20c%200.07554,0.26595%200.243654,0.40847%200.564475,0.34737%20l%203.256579,-2.30132%20c%200.129015,-0.0591%200.162493,-0.21382%200.08684,-0.47763%20l%20-0.04342,-14.37236%20c%20-0.08385,-0.69624%20-0.397481,-1.27758%20-1.21579,-1.60658%20l%20-12.505264,-5.34079%20c%20-0.369305,-0.007%20-0.689669,-0.15995%20-1.172369,0.17368%20z'%20id='path596'%20sodipodi:nodetypes='ccccccccccccccccccccccc'%20/%3e%3cpath%20style='opacity:1;fill:%23027c87;fill-opacity:1;stroke-width:0.499999'%20d='m%2087.341446,128.97138%20-0.976974,0.99869%20c%20-0.043,0.13026%20-0.162424,0.26052%200.01085,0.39078%20l%202.844078,2.7681%20c%200.207109,0.18038%200.397145,0.15588%200.575329,-0.0109%20l%204.081578,-4.40724%20c%200.07906,-0.12311%200.131796,-0.24997%200.01085,-0.40164%20l%20-0.455919,-0.46678%20c%20-0.112972,-0.13832%20-0.2749,-0.10529%20-0.445066,-0.0434%20l%20-3.310856,2.92006%20c%20-0.10821,0.0681%20-0.184736,0.0728%20-0.20625,-0.0326%20l%20-1.834539,-1.78026%20c%20-0.09769,-0.0343%20-0.195387,-0.0954%20-0.293081,0.0651%20z'%20id='path598'%20sodipodi:nodetypes='ccccccccccccc'%20/%3e%3cpath%20style='opacity:1;fill:%2300808b;fill-opacity:1;stroke-width:0.499999'%20d='m%2096.221752,128.89127%20-3.653695,3.7151%20v%207.3381%20c%20-0.0064,0.34044%200.221982,0.49827%200.583362,0.55266%20l%2013.877901,-1.8422%20c%200.1104,-0.096%200.17316,-0.21236%200,-0.42985%20l%20-10.347018,-4.82042%20c%20-0.127726,-0.0731%20-0.329178,-0.0909%20-0.307033,-0.27633%20l%200.06141,-4.05284%20c%200.03892,-0.22724%20-0.09564,-0.19427%20-0.214927,-0.18422%20z'%20id='path600'%20sodipodi:nodetypes='cccccccccc'%20/%3e%3c/g%3e%3c/g%3e%3c/svg%3e) Live-E
Live-E
Live-E
Live-E
Guest seating
Search your name to see your table or seat assignment.
Documents
Layout
%20--%3e%3csvg%20width='30.194817mm'%20height='39.337067mm'%20viewBox='0%200%2030.194817%2039.337067'%20version='1.1'%20id='svg5'%20xml:space='preserve'%20xmlns:inkscape='http://www.inkscape.org/namespaces/inkscape'%20xmlns:sodipodi='http://sodipodi.sourceforge.net/DTD/sodipodi-0.dtd'%20xmlns='http://www.w3.org/2000/svg'%20xmlns:svg='http://www.w3.org/2000/svg'%3e%3csodipodi:namedview%20id='namedview7'%20pagecolor='%23ffffff'%20bordercolor='%23000000'%20borderopacity='0.25'%20inkscape:showpageshadow='2'%20inkscape:pageopacity='0.0'%20inkscape:pagecheckerboard='0'%20inkscape:deskcolor='%23d1d1d1'%20inkscape:document-units='mm'%20showgrid='false'%20/%3e%3cdefs%20id='defs2'%20/%3e%3cg%20inkscape:label='Layer%201'%20inkscape:groupmode='layer'%20id='layer1'%20transform='translate(-76.942102,-102.56294)'%3e%3cg%20id='g4193'%20inkscape:export-filename='livee_logo.svg'%20inkscape:export-xdpi='96'%20inkscape:export-ydpi='96'%3e%3cpath%20style='opacity:1;fill:%23ffffff;fill-opacity:1;stroke-width:0.499999'%20d='m%2077.897367,104.51447%20c%20-0.513922,0.42002%20-0.82772,0.96392%20-0.911842,1.65%20l%20-0.04342,33.04342%20c%200.398517,1.73257%201.683955,2.4707%203.430263,2.69211%20l%209.726316,-1.21579%20c%200.502517,0.0104%200.685226,-0.29899%200.781579,-0.69474%20l%20-0.08684,-3.5171%20c%20-0.167375,-0.5303%20-0.472527,-0.91135%20-1.128948,-0.91185%20l%20-5.340789,0.21711%20c%20-0.575557,-0.1277%20-0.775958,-0.5055%20-0.738158,-1.04211%20l%200.04342,-24.44605%20c%20-0.0024,-0.62613%200.435514,-0.56727%200.78158,-0.65131%20l%207.642105,2.99605%20c%200.649756,0.22412%200.588652,0.75924%200.607894,1.25921%20l%20-0.130262,12.46184%20c%200.07554,0.26595%200.243654,0.40847%200.564475,0.34737%20l%203.256579,-2.30132%20c%200.129015,-0.0591%200.162493,-0.21382%200.08684,-0.47763%20l%20-0.04342,-14.37236%20c%20-0.08385,-0.69624%20-0.397481,-1.27758%20-1.21579,-1.60658%20l%20-12.505264,-5.34079%20c%20-0.369305,-0.007%20-0.689669,-0.15995%20-1.172369,0.17368%20z'%20id='path596'%20sodipodi:nodetypes='ccccccccccccccccccccccc'%20/%3e%3cpath%20style='opacity:1;fill:%23027c87;fill-opacity:1;stroke-width:0.499999'%20d='m%2087.341446,128.97138%20-0.976974,0.99869%20c%20-0.043,0.13026%20-0.162424,0.26052%200.01085,0.39078%20l%202.844078,2.7681%20c%200.207109,0.18038%200.397145,0.15588%200.575329,-0.0109%20l%204.081578,-4.40724%20c%200.07906,-0.12311%200.131796,-0.24997%200.01085,-0.40164%20l%20-0.455919,-0.46678%20c%20-0.112972,-0.13832%20-0.2749,-0.10529%20-0.445066,-0.0434%20l%20-3.310856,2.92006%20c%20-0.10821,0.0681%20-0.184736,0.0728%20-0.20625,-0.0326%20l%20-1.834539,-1.78026%20c%20-0.09769,-0.0343%20-0.195387,-0.0954%20-0.293081,0.0651%20z'%20id='path598'%20sodipodi:nodetypes='ccccccccccccc'%20/%3e%3cpath%20style='opacity:1;fill:%2300808b;fill-opacity:1;stroke-width:0.499999'%20d='m%2096.221752,128.89127%20-3.653695,3.7151%20v%207.3381%20c%20-0.0064,0.34044%200.221982,0.49827%200.583362,0.55266%20l%2013.877901,-1.8422%20c%200.1104,-0.096%200.17316,-0.21236%200,-0.42985%20l%20-10.347018,-4.82042%20c%20-0.127726,-0.0731%20-0.329178,-0.0909%20-0.307033,-0.27633%20l%200.06141,-4.05284%20c%200.03892,-0.22724%20-0.09564,-0.19427%20-0.214927,-0.18422%20z'%20id='path600'%20sodipodi:nodetypes='cccccccccc'%20/%3e%3c/g%3e%3c/g%3e%3c/svg%3e) Live-E
Live-E
Plan. Design. Invite. Manage. Deliver.
Live-E is an AI-Powered Event Planning Platform for organisers who want guest operations, seating, and AI-assisted event design in one workflow.
Sign in to your account
By continuing, you agree to our Terms of Service and Privacy Policy.
Live-E
Legal
Last updated: May 30, 2026
These Terms of Service (“Terms”) govern your use of Live-E, including account access, event setup, guest management, check-in tools, invitations, and paid seating/site-map features.
By creating an account, signing in, or using Live-E, you agree to these Terms for yourself and, where applicable, on behalf of your organization.
You must be legally capable of entering a binding agreement and provide accurate account details. Live-E currently supports sign-in via Google, Apple, and email/password.
You are responsible for account security and all activity under your account, including activity by invited organizers and ushers.
Event owners/admins control event settings and organizer invitations. Organizers may manage guests, assignments, and check-ins according to configured permissions. Ushers are limited to door-operation workflows.
You represent that you have the legal right to upload and process attendee data, and that your event content and communications comply with applicable law.
You must not misuse Live-E, bypass authorization, interfere with service availability, upload malicious content, scrape personal data, or use the service for unlawful activity.
You must not share credentials in a way that bypasses role-based permissions or exposes guest data to unauthorized users.
Live-E includes free usage limits and paid upgrades. Paid features may include site-map/layout capabilities, higher guest volumes, event unlocks, or subscription plans as shown at checkout.
Prices, taxes, billing cycle, and renewal terms are shown at purchase. Subscription plans renew automatically unless cancelled before renewal in the billing portal.
Failure to pay may suspend paid features while preserving baseline account access where applicable. Unless required by law, fees are non-refundable.
Live-E relies on third-party providers (such as authentication, storage, messaging, and payment processors). Their terms and availability may affect service behavior.
Live-E software, branding, and documentation are owned by Live-E or licensors. You retain ownership of your uploaded event and guest data, and grant Live-E a limited license to process that data to operate and secure the service.
We implement operational safeguards, but you should keep your own exports/backups of critical event data, especially before live event operations.
We may modify, improve, or retire features. We target reliable availability but cannot guarantee uninterrupted or error-free operation at all times.
Except where prohibited by law, Live-E is provided “as is” and “as available” without warranties of any kind, express or implied.
To the maximum extent permitted by law, Live-E is not liable for indirect, incidental, special, consequential, or punitive damages, including loss of profits, data, goodwill, or business interruption.
You may stop using Live-E at any time. We may suspend or terminate access for material breach, fraud, security risk, abuse, or legal compliance requirements.
These Terms are governed by the laws of the jurisdiction where the Live-E operating entity is established, unless consumer law requires otherwise.
We may update these terms periodically. Continued use after updates constitutes acceptance of the revised terms.
For legal, contractual, data, or account questions, contact: admin@soulstec.com (replace with your production legal/support inbox).
Live-E
Legal
Last updated: May 30, 2026
This Privacy Policy explains how Live-E collects, uses, stores, and shares personal data when you use our AI-Powered Event Planning Platform.
Depending on your role and usage, we may process:
Account data (name, email, auth provider ID), event and organization metadata, guest list data (guest names, groups, table assignment, notes, check-in/VIP status), device/session logs, and support records.
Data is collected directly from users, imported via forms/CSV, generated by product usage, or received from authentication/payment providers.
We use data to operate the service, authenticate users, enforce roles/permissions, manage guests/tables/check-ins, provide paid features, process billing, monitor reliability, and provide support.
Where required by law, legal bases include contract performance, legitimate interests, legal compliance, and consent (where applicable).
We share data with processors that provide hosting/database services, authentication, payment processing, logging/monitoring, and transactional communications, under contractual safeguards. We do not sell personal data.
Data may be processed in countries outside your own. Where legally required, we apply transfer safeguards such as contractual protections.
We retain personal data for as long as necessary to operate Live-E, meet legal/accounting obligations, resolve disputes, and enforce agreements. Retention depends on data type and account status.
We apply administrative, technical, and organizational safeguards, including authentication controls, role-based authorization, encryption in transit, and operational monitoring.
Depending on your location, you may have rights to access, correct, delete, export, restrict, or object to processing. You may request these by contacting support; we may need to verify identity before actioning requests.
Live-E is not directed to children for independent use. Event organizers remain responsible for lawful collection and processing of attendee data, including minors where applicable.
We use essential session/storage technologies for sign-in, security, and service functionality. We may also use operational analytics to maintain and improve reliability.
We may update this Privacy Policy from time to time. Material updates will be reflected by the revised “Last updated” date.
For privacy requests or complaints, contact: admin@soulstec.com (replace with your production privacy contact).
Plan, design, invite, manage, and deliver smoother events from one platform.
LET'S START
Start a new event, explore AI hall design, or join an event you already work on.
Guided flow
Follow these steps to move from planning to a smooth event-day check-in.
Start a new event workspace for planning, guest coordination, and event-day delivery.
Generate hall design concepts from your references and layout.
Use a code to join as an usher, organiser, or event-day teammate.
Recent AI Designs
Recent hall concepts across your events. Open an event to refine, favourite, or download them.
Your events
Pricing
Live-E is priced for organisers using an AI-Powered Event Planning Platform for one-off guest operations and repeat events, with paid unlocks for advanced guest experience, event coordination, seating, and larger AI-assisted decor capacity.
Current pricing shape
Free up to 50 guests
Upgrade when an event outgrows the free threshold or when you need paid features such as Site Map, Event QR guest information pages, and larger AI Decor credit allowances.
Starter
£0/event
Use this to launch, trial, and run smaller guest lists.
One-off
£9.99/event
Best when one specific event needs to go beyond the free guest cap.
Recurring
£15.99/month
Built for organisers who run events continuously and want organisation-wide unlocks.
Annual
£149.99/year
For established operators who want predictable annual billing.
Add-on
£5/100 credits
Free events can buy a smaller 100-credit pack when they need more concept rounds, prompt refinement, or final HD renders.
Feature matrix
| Capability | Free | Unlock | Monthly | Yearly |
|---|---|---|---|---|
| Create and manage events | Included | Included | Included | Included |
| Guest search, QR passes, and check-in | Included | Included | Included | Included |
| CSV import and export workflows | Included | Included | Included | Included |
| Invite sharing and RSVP tracking | Included | Included | Included | Included |
| Role-based organiser and usher access | Included | Included | Included | Included |
| Site map workspace | No | Yes | Yes | Yes |
| Event QR guest information page | No | Yes | Yes | Yes |
| Programme, menu, and guest-facing public assets | No | Yes | Yes | Yes |
| AI Hall Decoration workspace | Yes | Yes | Yes | Yes |
| Included AI credits | 25 / month | +50 one-time unlock bonus | 100 / month | 100 / month |
| AI credit top-up eligibility | Yes | Yes | Yes | Yes |
| More than 50 guests on one event | No | Yes | Yes | Yes |
| More than 50 guests across all organisation events | No | Only unlocked event | Yes | Yes |
| Subscription billing portal | No | No | Yes | Yes |
Choose it when one event exceeds 50 guests or when one event needs paid tools such as Site Map and Event QR, but you do not need a recurring organisation subscription.
Choose monthly or yearly when your organisation runs events repeatedly and wants all events to operate beyond the free guest threshold with Site Map, Event QR, and monthly AI Decor credits available across events.
Yes. Free includes event setup, guest operations, usher access, invite sharing, pass sharing, RSVP capture, check-in, and a starter AI Hall Decoration allowance, up to the free guest limit.
Live-E uses a staged credit model: concept sets, refinement passes, and final HD outputs each consume a defined credit amount. Free events start with a small included allowance, paid plans increase that allowance, and any event can be extended with top-ups.
Help center
Filter guidance by role and switch between Getting Started, Common Questions, and Video Tutorials.
Step 1: On the sign-in screen, choose Google, Windows, or email/password.
Step 2: After login, you land on Dashboard.
Step 3: In Your events, click Open on the event you want to work on.
Step 4: If someone shared a role request with you, click Open Live-E sign in, sign in, then use Join Event on Dashboard with the code shown on the request page.
Step 5: Inside the event, use the workspace tabs to move between Plan, Guests & Invites, Event Day, Design, Team, and Settings.
Tip: Open Help from the left sidebar, then select Getting Started, Common Questions, or Video Tutorials from the Help submenu.
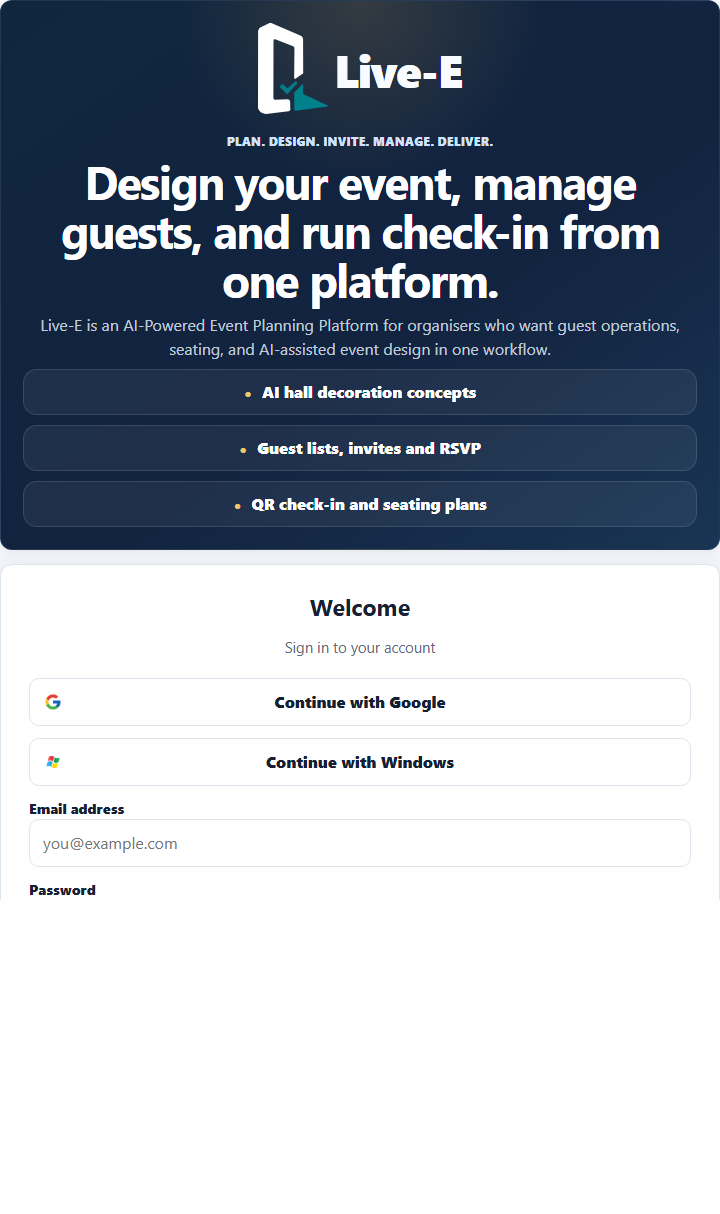
Sign in using Google, Windows, or email/password. Then open Dashboard to access your events.
Step 1: Dashboard → Create event.
Step 2: Fill organization, event name, date, location, estimated guests, then submit.
Step 3: In the event workspace, open the Settings tab for Edit event, Delete event, billing, and reset actions.
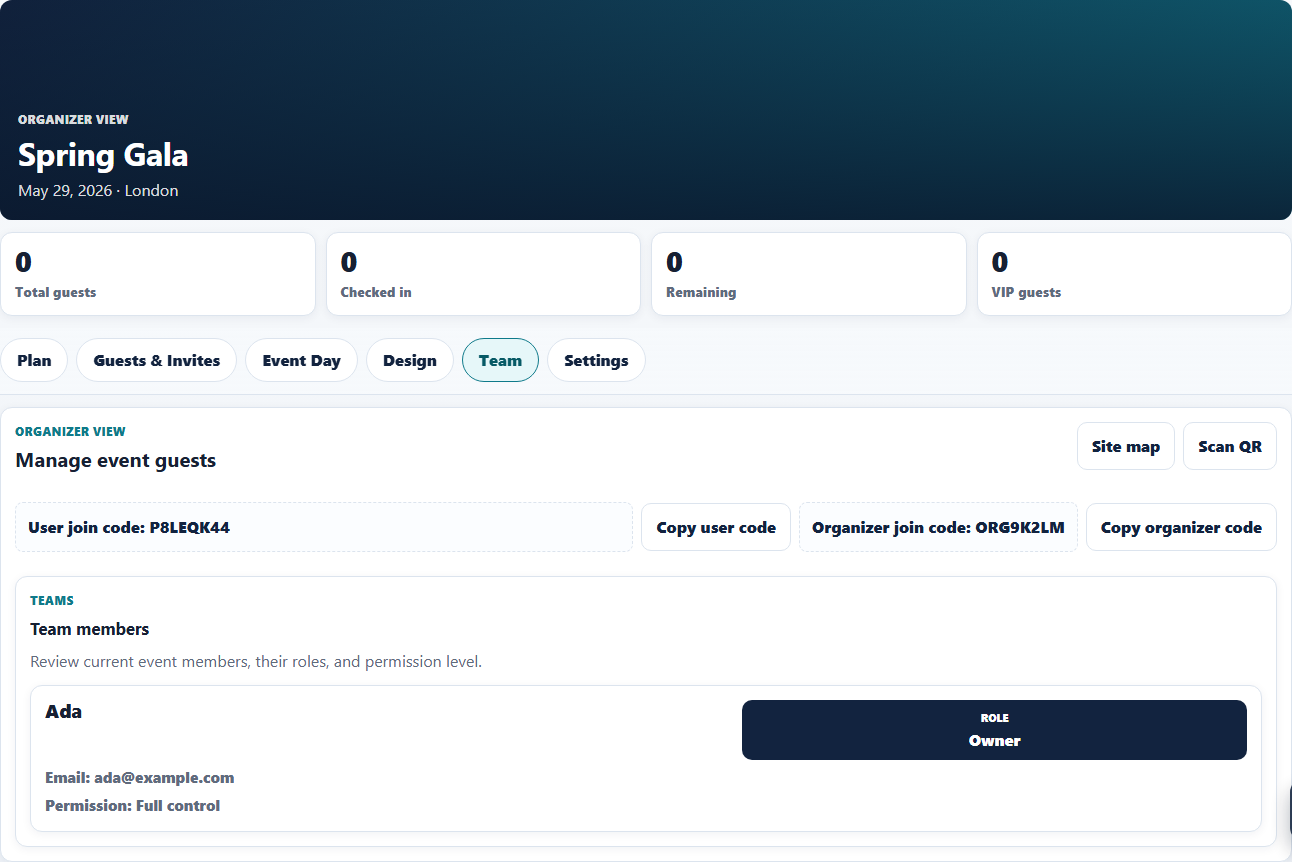
Step 4: Share Organizer join code to onboard organizers via Dashboard → Join Event.
Step 5: Open the Settings tab and use Privilege settings to promote organizers (including Owner) or limit access (Usher/Viewer).
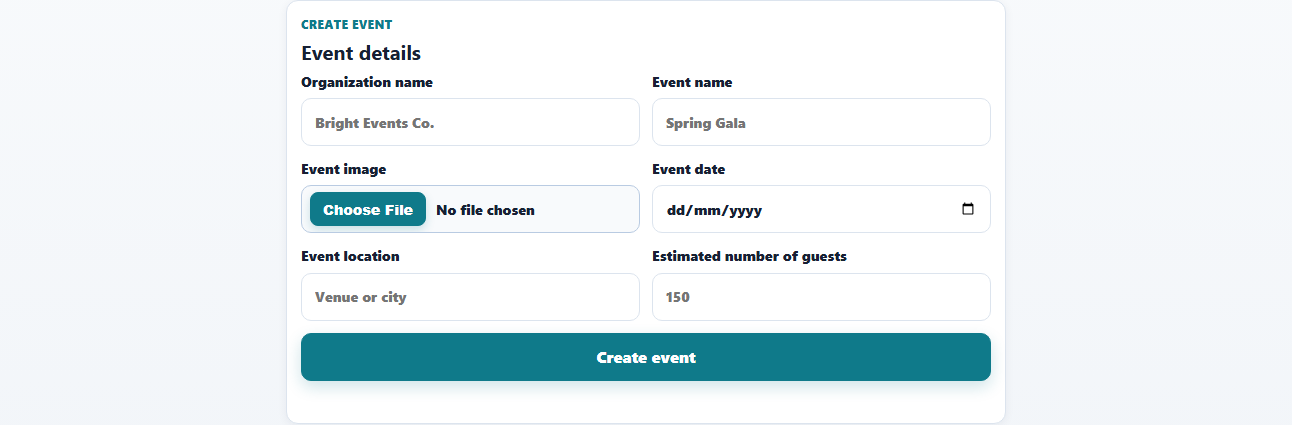
Complete event details and submit. Owner/admin users can later edit or delete the event.
Step 1: Open the Guests & Invites tab, then click Import guests.
Step 2: Live-E imports guests and auto-matches table names where possible.
Step 3: If names differ (e.g. Table 1 vs T1), the Resolve table names dialog appears.
Step 4: Choose mapping for each unmatched name and click Apply mappings.
Load your CSV or Excel file, review matched tables, then resolve unmatched names before finalizing.
Step 1: Open the Guests & Invites tab and use Add guest or edit guest cards.
Step 2: Assign guests to tables from site-map panel or organizer guest workflow.
Step 3: Use Share invite / Guest pass / Export pass links.
Step 4: Guest invite previews and pass pages open in a new tab so the app page stays on the current event.
Step 5: Use summary counters to monitor checked-in vs remaining guests.
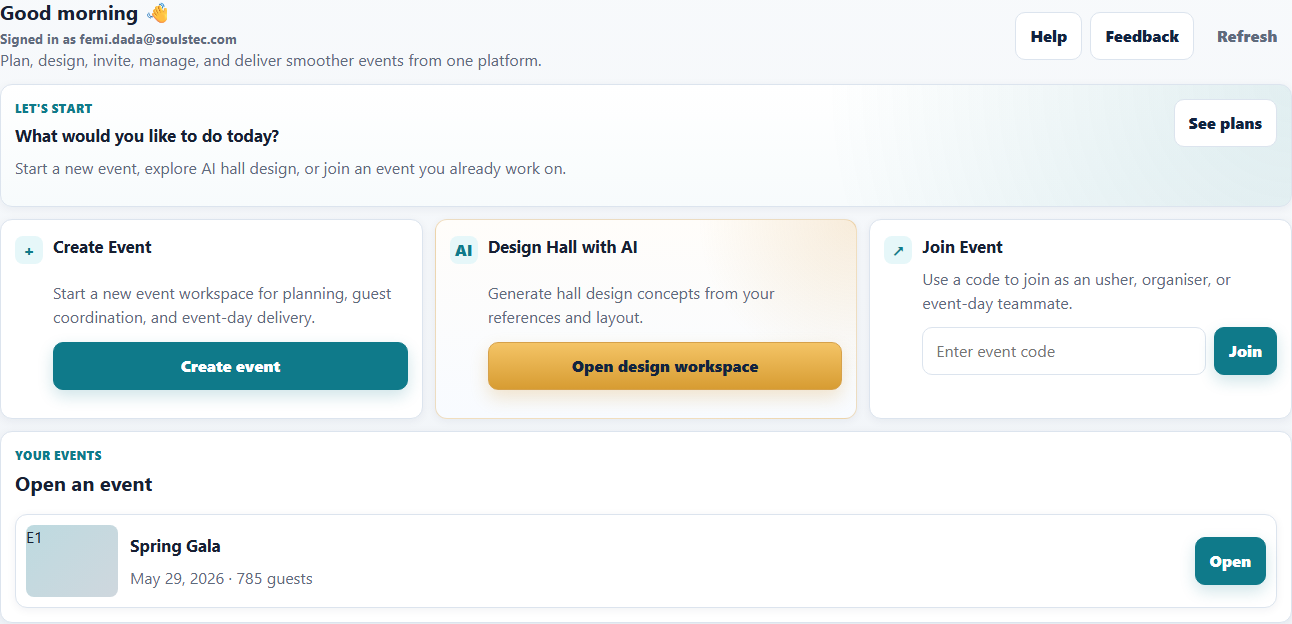
Use dashboard actions to create/join events, then open an event to manage guest records and sharing.
Step 1: Open the Guests & Invites tab and find Invite template.
Step 2: Select image source (None, Use event image, or Upload invitation image), then set email subject and message template.
Step 3: Use placeholders like {{guest_name}}, {{event_name}}, {{event_date}}, {{event_location}}, {{table_number}}, and {{group_name}}.
Step 4: Click Save template, then use Preview invite page to validate layout and content.
Step 5: Use guest Share invite or Guest pass Email / SMS / WhatsApp; each message uses the invite landing page link.
Step 6: Guest RSVP choices (Accept/Maybe/Decline) are shown on organizer guest cards.
Step 7: None removes the invite image, Use event image uses the event image, and Upload invitation image uses the uploaded template image.
Step 8: Send request is hidden for Guest and only appears when Invitee type is Organizer or Usher.
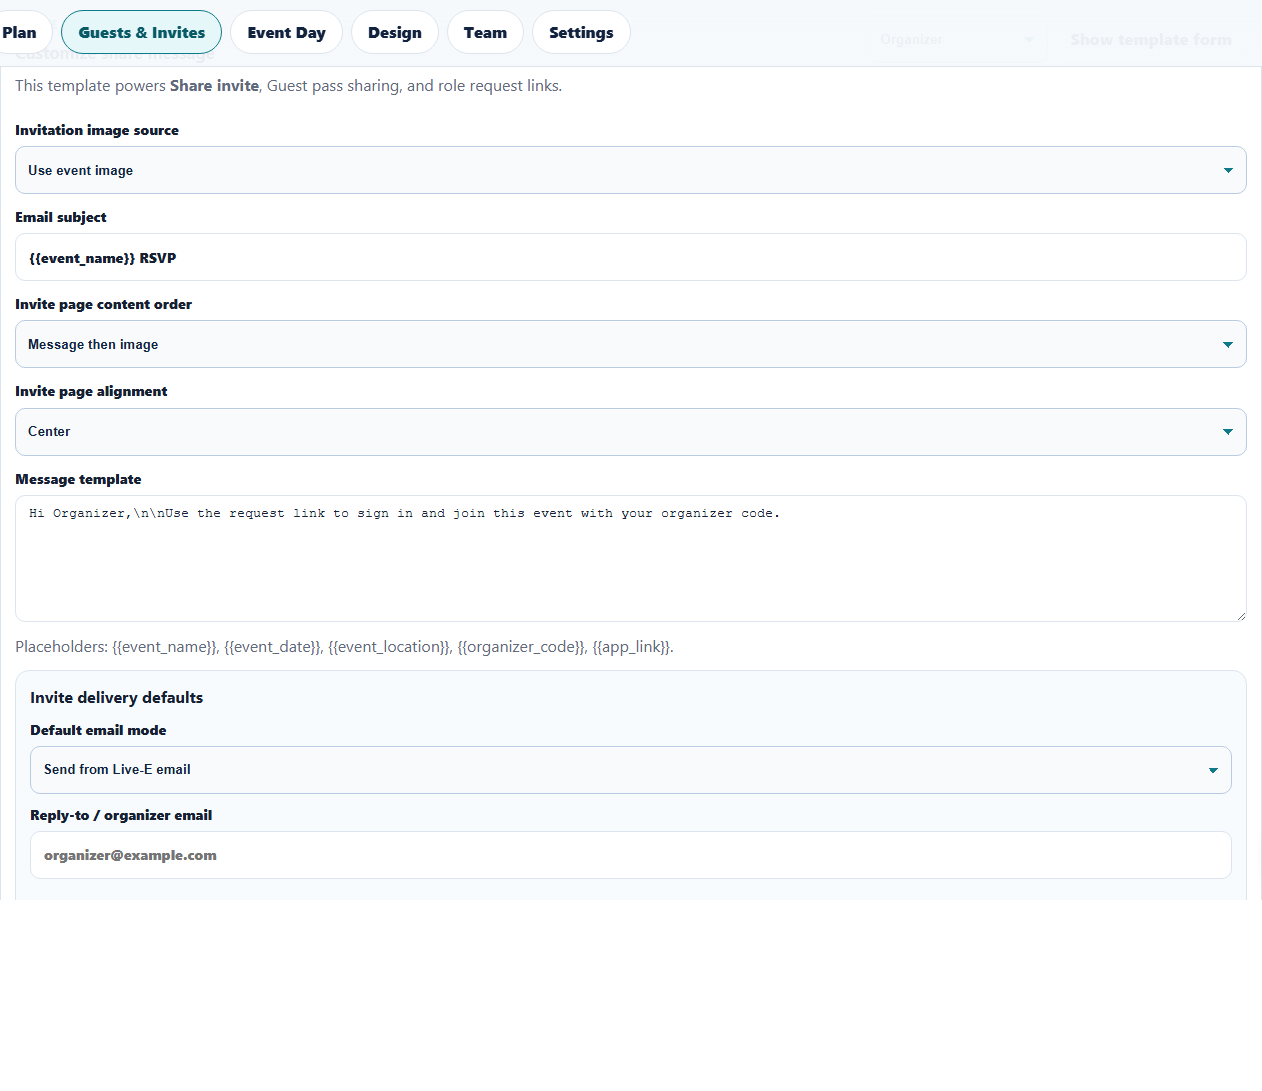
Set your invite template once and reuse it across Share invite and Guest pass channels.
Step 1: Open the Team tab. In Invite template, switch Invitee type to Organizer or Usher.
Step 2: Choose image source and click Save template so the public request page uses the current setup.
Step 3: Click Send request to open the share dialog.
Step 4: Use Copy message, Email, WhatsApp, or SMS to send the request.
Step 5: The request opens in a new tab, keeps the app page open, shows the matching event code, and includes an Open Live-E sign in button.
Step 6: Role request links are short and compact. They use the event code plus a small image-source flag instead of a long embedded image URL.
Role requests use compact links, show the correct event code, and keep the app page open while the invite page opens in a new tab.
Step 1: If you see a lock icon on the Event QR card or buttons, the feature is premium and the event is still locked.
Step 2: Open the Settings tab and use the Billing card to unlock the event or start an active subscription.
Step 3: Once unlocked, the lock icon is removed and the full Event QR tools become available.
Step 4: Open the Settings tab and find Guest info QR.
Step 5: Enable the public page, add a title and message, and decide whether the site map should be shown.
Step 6: Upload programme, menu, or other guest-facing files. Image files show thumbnails; document files show format badges.
Step 7: Use Publish / Unpublish per asset to control what guests can see.
Step 8: Guests can now use the public page to search their name and find their assigned table or row seat near the top of the page.
Step 9: Return to Plan to review the Event QR card, copy the link, preview the public page, or open the QR dialog.
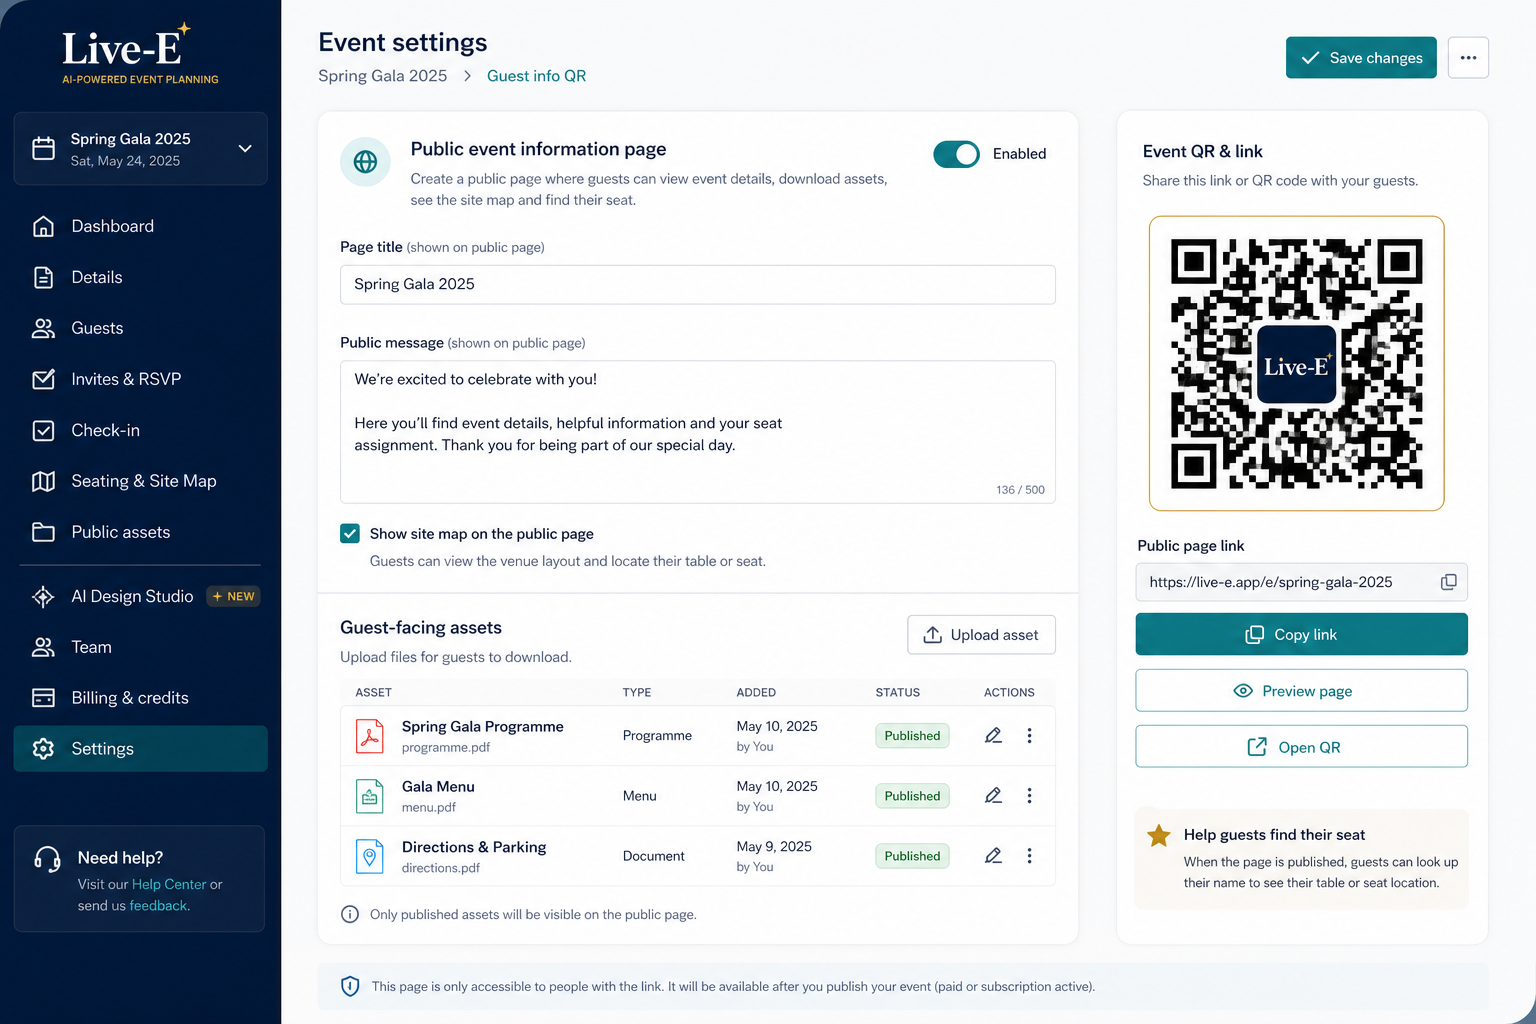
Publish the guest information page, upload public assets, and share the Event QR link so guests can view event details and find their seat.
Step 1: If the Site map button shows a lock icon, the feature is premium and the event is not unlocked yet.
Step 2: Open the Settings tab and use the Billing card to unlock the event or activate subscription access.
Step 3: Once unlocked, use the existing Site map button to open the workspace.
Step 4: Set hall shape and dimensions.
Step 5: Add fixed units, tables, and row seating blocks; drag to position and rotate from the object center.
Step 6: Use row seat blocks for conference, theater, church, or audience layouts where seats are arranged by rows and columns.
Step 7: Assign guests either to named tables or to a row seat block seat such as A1, A2, or B4.
Step 8: Click the full-screen icon ⛶ at the top-right of the layout canvas to enter full-screen mode.
Step 9: Run Auto-arrange when you are ready to recompute table placement.
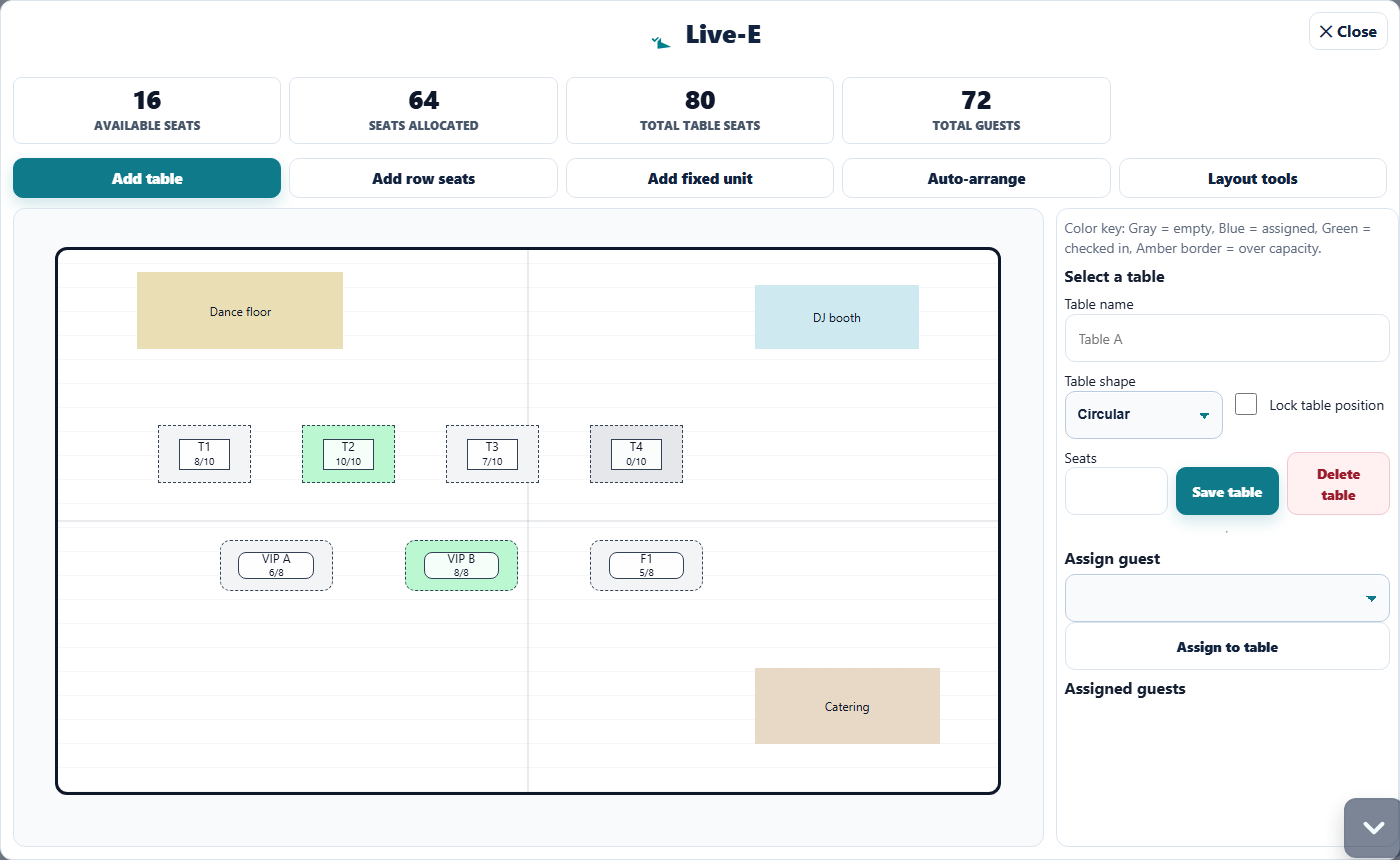
Use ⛶ to focus on layout work in full-screen mode, then close with the top-right close control.
Step 1: Open the Design tab and go to AI Design Studio.
Step 2: Upload your venue / layout and stage / focal area references first. Then add optional decor references such as table styling, drapes, chandeliers, dance floor, ceiling drape, flooring, palette, and mood.
Step 3: Complete the brief with style direction, vision, time of day, colours, and optional prompt notes.
Step 4: If your site map and seating layout are ready, enable Use existing Site Map + hall layout as layout context so table placement, row seat blocks, stage, and other fixtures can shape the render brief.
Step 5: Click Save brief when you want to lock in the current reference and settings state before generating.
Step 6: Choose a render mode, then click Generate designs. Your credit summary shows how many credits are available and whether you have enough for another concept set.
Step 7: Use the gallery to preview concepts, select favourites, download images, delete unwanted concepts, or open a concept for review.
Step 8: Use Refine selected after choosing a concept. Quick refinement chips add useful instructions to the current prompt, but they do not auto-run a render until you click generate again.
Step 9: Review Design package to see the selected concept, colour direction, references used, and whether site-map context was included.
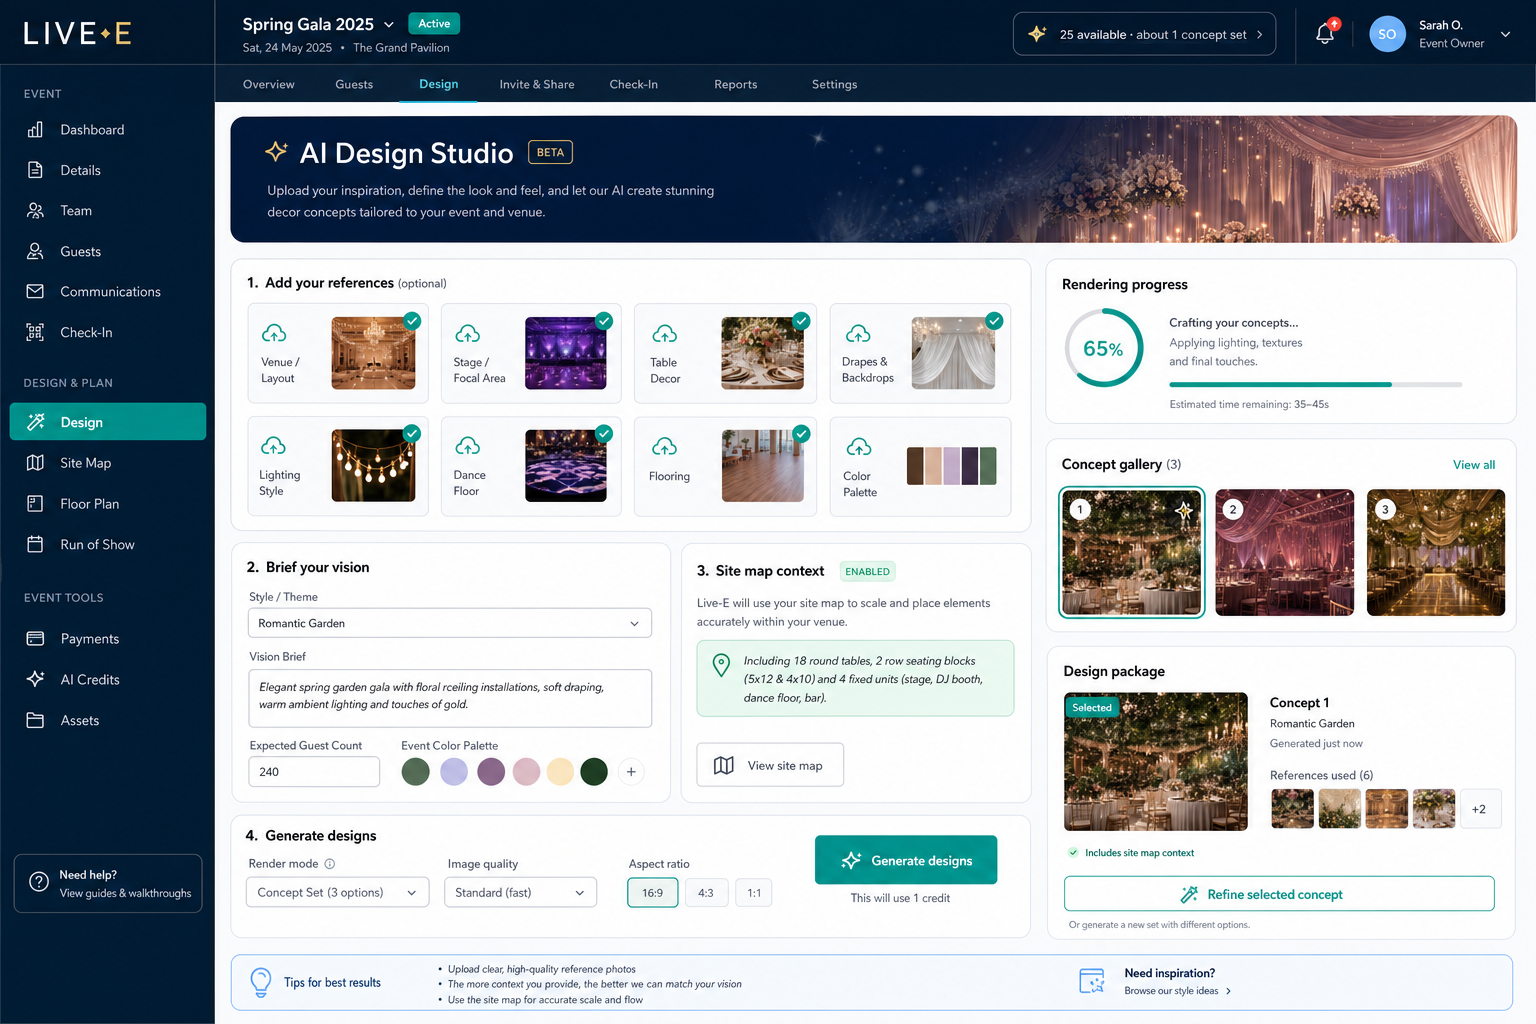
Use AI Design Studio to combine venue references, site-map context, and prompt direction into concept sets you can review and refine.
Step 1: Join event with User join code (Dashboard → Join Event).
Step 2: Open the Event Day tab, then search by guest name/group/table.
Step 3: Use Scan QR for fast entry; fallback is manual token paste.
Step 4: Toggle check-in status as guests arrive.
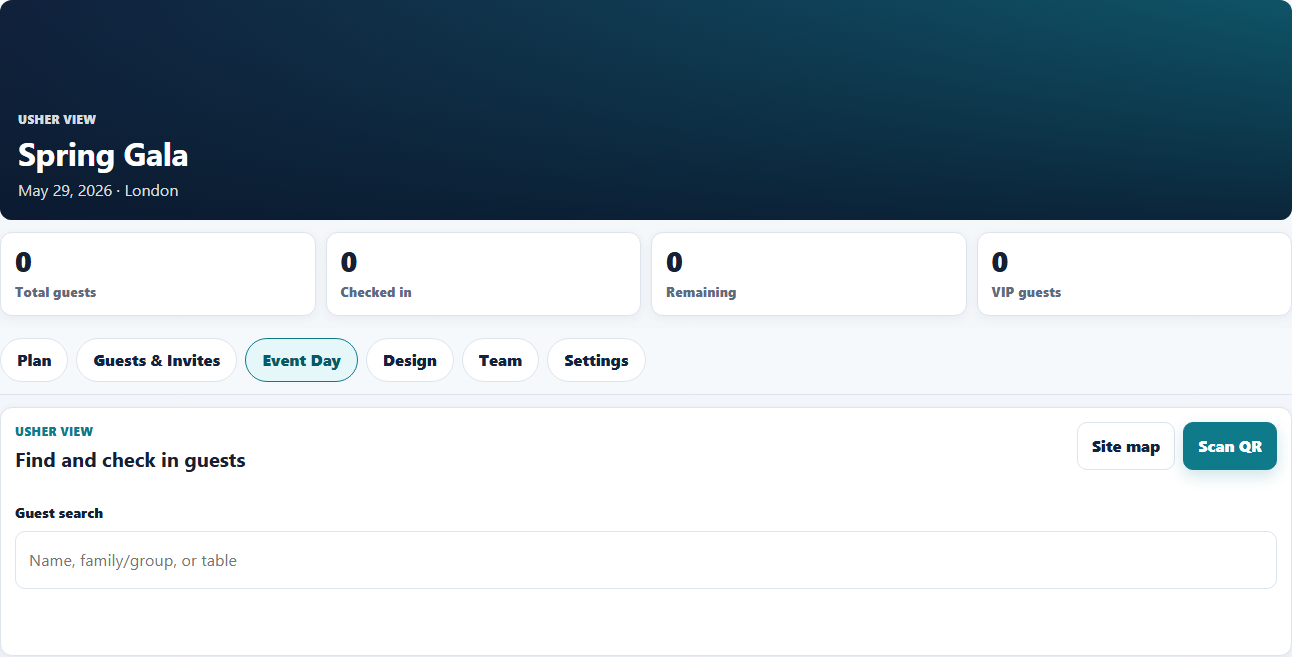
For event-day operations, search guests quickly and check in by Scan QR or manual selection.
The guest needs an event_table_id link. Use Assign to table or run CSV table reconciliation.
Owners can edit/delete events and manage privileges from the Settings tab. Admin organizers can operate guests/check-in and event workflows but cannot delete the event.
Organizers use the Organizer join code in Dashboard → Join Event. This keeps organizer privileges on join.
Ushers use the Usher join code from the request page or organizer share message, then enter it in Dashboard → Join Event after signing in.
Send request only appears when Invitee type is Organizer or Usher. It is intentionally hidden for Guest templates.
Invite previews and Event QR public page previews open in a new tab so you can inspect the public page without losing your current place in the app.
No. Ushers can search, scan, and check guests in/out but cannot change event setup.
Yes. Open the Settings tab, choose Privilege settings, then assign the member role to Owner.
If the button shows a lock icon, Site map is a premium feature for that event. Open Settings, then use the Billing card to unlock the event or activate a subscription.
If the card or action buttons show a lock icon, Event QR is still locked as a premium feature. Open Settings, unlock the event or activate subscription in the Billing card, then enable the public event information page.
Only assets marked Published appear on the public Event QR page. Hidden assets stay in the organizer list until you publish them.
If the organizer has published the Event QR page, guests can use the Find your seat search near the top of that page. It searches by guest name and shows the assigned table or row seat.
After import, use Resolve table names dialog to map CSV names to existing site-map table names.
Use row seating blocks for audience-style layouts such as conferences, worship events, theater seating, ceremonies, or presentations. Use tables for banquet and dining layouts.
Live-E stores the block label plus seat label together, for example Audience 1 • A3. That same assignment appears in organizer views, guest passes, and the public Event QR seat finder.
Check that you added the required references first, especially Venue / layout and Stage / focal area. Also confirm you have enough AI credits for the selected render mode.
It uses the currently selected concept as the visual base for the next render. This is the correct mode when you want improved variants of an existing concept rather than a fresh concept set.
Credits are consumed when you generate concept sets or refinements. The credit panel shows your current balance and whether it is enough for another concept set. Top-up options appear in the AI Design Studio area and pricing flow based on your account or event access.
Use a smaller/compressed image. Recommended: JPG/WEBP around 1200px wide to keep upload and browser handling reliable.
None hides the image, Use event image shows the event image, and Upload invitation image uses the uploaded invite image. Save the template before sharing the request.
Save the template again after changing the image source. The public request page uses the last saved Organizer or Usher template settings.
Role request links now use compact query values and load event details from the server, which keeps the link shareable while still showing the right code and image.
The page shows the role type, event name, matching event code, current image choice, and a direct link back to Live-E sign in.
Live-E now clears stale form status text when key fields change, so feedback always reflects the latest input.
Sign in with Google/Windows or email/password and land on dashboard.
Create an event, review the setup journey in Plan, and move through Plan, Guests & Invites, Event Day, Design, Team, and Settings.
Open Guests & Invites, configure the invite template, import guests, and confirm that invite links, guest passes, and RSVP pages use the saved template.
Open Team, invite organizers or ushers, use Send request sharing actions, and confirm the request page shows the right event code, image, and sign-in action.
Open the invite link in a new tab, respond Accept/Maybe/Decline, open the guest pass card, and review the public Event QR page without losing app context.
Join with the usher code, open Event Day, search guests, scan QR, and mark attendance at the door while monitoring duplicate scans and check-in state.
Import a CSV or Excel guest list from Guests & Invites, validate mappings, and resolve unmatched tables before assigning seats.
Open Design, define the layout, add fixed units, tables, and row seating blocks, then assign guests and review seating capacity.
Open the Design tab, upload venue and decor references, enable site-map context when available, generate concept sets, and move into review and refinement.
Create event
Open an event to start.
Total guests
Checked in
Remaining
VIP guests
Plan
Use this planning view for a quick snapshot, then move into Guests & Invites, Event Day, Design, Team, or Settings for focused work.
Guided flow
Use this as a simple planning reference while you move through the event workflow.
Event QR
Guest info QR is not available yet.
Publish one QR code for guests to open event details, uploaded documents, and seating information.
No event info preview available.
Usher view
Organizer view
AI Design Studio Beta
Build a venue-aware decor brief, generate concept sets, then refine the strongest direction for this event.
Flagship workflow
Use venue references, focal-area styling, palette direction, and optional Site Map context to generate realistic concept sets for this event.
Step 1
Keep venue layout references separate from styling references so the prompt can preserve the room while changing decor.
Step 2
The prompt builder keeps room layout fixed and decor styling flexible.
Settings
Billing
Events include 50 free guests.
Guest info QR
Paid events can publish one QR code for guests to open event information, programme, menu, and layout details.
Uploads
Privilege settings
Owners can open member privileges and change organizer, usher, viewer, or owner access.
Privilege settings
Owners can update or remove organizers, ushers, and viewers from this event.
Invite template
This template powers Share invite, Guest pass sharing, and role request links.
Teams
Review current event members, their roles, and permission level.
Event site map